FAQs
FAQ Subject
Please check the "Model Number label" on the FCC label at the bottom of the device. The Label is descripting as below:
|
Model |
GT-80x(v2) |
GT-80x(v1) |
|
Hardware Version |
2 |
1 |
|
Modem Number Label |
"GT-802 (v2) AA40238AXXXXXXX" |
"GT-802 AA402381XXXXXXX" |
The major different between GT-80x(v2) and GT-80x(v1) are the supported Jumbo frame size and the new feature – OAM (operations, administration, and maintenance) Terminal/Edge mode supported. Except the two items, GT-80x(v2) and GT-802(v1) have the same appearance and functions.
|
Model |
GT-80x(v2) |
GT-80x(v1) |
|
Jumbo Frame Size |
9K bytes |
1536 bytes |
|
OAM |
TS-1000 OAM terminal mode |
-- |
|
OAM Loop Back Test Reply |
Yes |
-- |
You can configure the connection established by (1) AP Client mode or (2) Super WDS mode.
(1) AP Client
(2) Super WDS
(3) Check Connection Status
NOTE:
1. Please remember to configure all equipment using a different IP address and DO NOT use DHCP IP.
2. In this configuration example,AP-1 acts as the master AP and AP-2 acts as the slave AP.
3. For PtMP application, please repeat the configuration of both APs.
4. In this document,5GHz radio is used as a configuration example;the procedure for 2.4GHz is the same.
[Procedure]
(1) AP Client
1. Use static IP in the PCs that are connected with AP-1 (Site-1) and AP-2 (Site-2). In this case,Site-1 is “192.168.1.100”, and Site-2 is “192.168.1.200”.

2. In AP-1,go to “Advanced à Network” to configure the IP address to static and must be different from AP-2.

3. In AP-1,go to “Advanced à 5.8G Wireless” page and configure the following wireless parameters:
(1) Channel : set to a fixed channel (e.g., Channel 48).
(2) Encryption : configure the encryption and passphrase (WPA2PSK_AES is suggested).

4. In the wireless main page,click “Apply” to save the configurations.
5. In AP-2,go to “Advanced à Network” to ensure the IP address is static and different from AP-1.

6. In AP-2,go to the “Wizard” page to configure the Operation Mode to “Repeater” mode. Then,click the “Scan AP” button to site-survey AP-1.

7. Select the AP-1.

8. Click the checkbox of the “lockmac” and select the same encryption as AP-1.Then, click “Next”.

9. In the 2.4G Wireless Settings page,click “Next”.

10. Wait for the settings to complete successfully.

11. In AP-2, go to the “Advanced à Device Status” page to check whether AP-2 is associated with AP-1 successfully.

12. Use command line tool to ping each other to ensure the link is successfully established.
For example,Site-1 is ping 192.168.1.200 while Site-2 is ping 192.168.1.100.


(2) Super WDS
1. Use static IP in the PCs that are connected with AP-1 (Site-1) and AP-2 (Site-2).In this case,Site-1 is “192.168.1.100”, and Site-2 is “192.168.1.200”.

2. In AP-1,go to “Advanced à Network” to configure the IP address to static and must be different from AP-2.

3. In AP-1,go to the “Advanced à 5.8G Wireless” page and configure the following wireless parameters:
(3) Channel : set to a fixed channel (e.g., Channel 48).
(4) Encryption : configure the encryption and passphrase (WPA2PSK_AES is suggested).

4. In the wireless main page,click “Apply” to save the configurations.
5. In AP-2,go to “Advanced à Network” to ensure the IP address is static and different from AP-1.

6. In both APs,go to the “Wizard” page to configure the Operation Mode to “Super WDS” mode.

7. On the first page,configure the 2.4G wireless SSID and encryption (WPA2-PSK/AES is suggested).Then,click “Next” for the next page.

8. On the second page,press “Scan AP” to search the other AP.

9. Select the AP that needs to establish the connection and click “Next”.

10. On the third page,enter the information and click “Next”.

11. Wait for the settings to complete successfully.

12. In the main page,please check whether the connection is established successfully.

13. You can also use command line tool to ping each other to ensure the link is successfully established.
For example,Site-1 is ping 192.168.1.200 while Site-2 is ping 192.168.1.100.


(3) Check Connection Status
[Example in Client]

(a) The Connection Status: “Connection is OK” means the connection is established.
(b) RSSI (Signal Strength) please refer to the table shown below:

Where regulations permit, you can establish high-speed, license-free connections between separate Local Area Networks (LANs). Connections can be set up quickly and are very cost-effective with wired alternatives, saving you the expenditure of a leased line. All you need are two Access Points. Using the directional antennas, typically attached to facing windows, you can create line-of-sight connections. This function is also called LAN to LAN or Interbuilding.
First of all, please install “VAC.exe” (Virtual Audio Control) first on your computer. The software can be found in \Utility\ of the CD-ROM. After the driver is installed, please launch WPG utility. Click Menu icon, and select “Send Audio to Display” to Yes. After restarting WPG utility, you can have the audio via the audio jack of the WPG-200N.
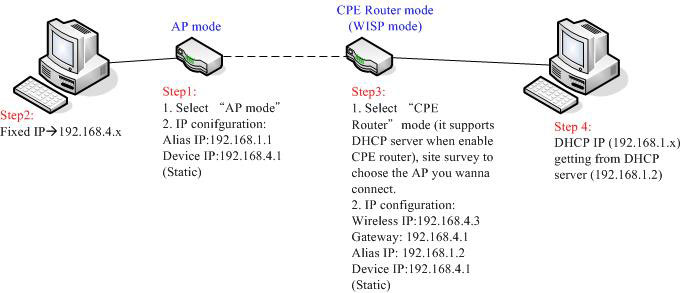
Please follow below figure and steps for CPE Router configuration.
For Outdoor AP installation, PLANET is with a set of cable for the wiring.
The WAP-6000 or WAP-7000 attaches one cable to one set of antenna, MAP-2000/2000R attaches two cables for two RF connectors.
And the connection diagram can be as below.

Example:
Figure1:

Figure 2: extend cable

Add booster (for example: WBT-1000, figure is similar to the application as above.):