FAQs
FAQ Subject
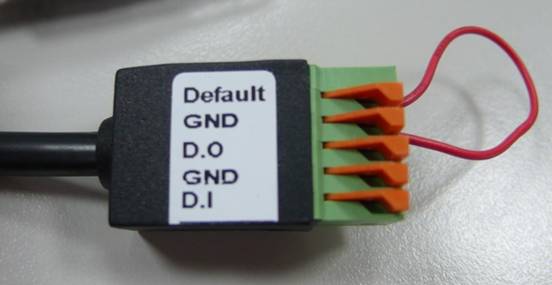
Please follow the steps below:
- Remove the power and Ethernet cable.
- Take an electronic wire and plug one side of the wire into "Default" and the other side into "GND" on the terminal block as the picture is shown below.
- Connect power to the camera again. It takes around 30 seconds to boot the camera.
- Remove the wire and plug it into the Ethernet cable after the camera finishes booting.
- Re-login the camera via the default IP (http://192.168.0.20). The user name and password are admin.
Default Gateway and DNS server address should be set up correctly. If FTP does not work properly, ask your ISP or network administrator about the transferring mode of FTP server.
When a PC connects to network camera for the first time, a pop-up Security Warning window will appear asking you to download ActiveX Controls. When using Windows XP, or Vista, log on with an appropriate account that is authorized to install applications.
Network congestion may prevent the image screen from appearing quickly. You may choose lower resolution to reduce the required bandwidth.
Maybe NAT router does not support UPnP function. Please check user’s manual of router and turn on UPnP function.
Maybe NAT router does not support UPnP function. Please check user’s manual of router and turn on UPnP function.
Make sure that your Internet Explorer is version 8.0 or later. If you are experiencing problems, try upgrading to the latest version of Microsoft’s Internet Explorer from the Microsoft webpage.
Please follow the steps below:
- Power on the camera and wait a while until the boot procedure is finished.
- Press the hardware reset button for over 10 seconds, and release it.
- Camera will reboot and restore to the factory default setting. The default user name and password are both admin.