FAQs
FAQ Subject
[Repeater Mode]
1) Please ensure your root AP has configured security key. Then, follow the instruction of section 4 in the Quick Guide to establish the connection between root AP & WNAP-1260.
**Note: For the first time setup, you can move WNAP-1260 close to the access point you wish to connect, after connection established, you can move WNAP-1260 to the place you wish to use.
2) After connected, please move WNAP-1260 to the place you wish to use.
In the system tray, double-click the wireless network icon, and then discover the WNAP-1260.
**Note: Please be noted that once established the connection with root AP via WPS button, the SSID and Security Key of WNAP-1260 will be the same as root AP.
In this case, the WNAP-1260 has been connected to WNRT-627 by WPS button, and the SSID and security key
have been synchronized as the same as root AP. So, you will see the WNAP-1260 displayed as the SSID “627”
in the list.

3) Check the option “Connect automatically”, and then click “Connect” button.
4) In the prompted dialog box, please enter the security key of your root AP’s.

5)After connected, go to “Network and Sharing Center-> Manage wireless networks”.

6) Ensure the WNAP-1260 has been saved to your wireless profile.
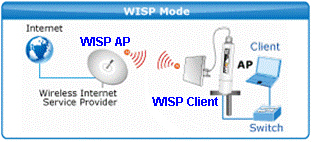
Topology (WNAP-6306 acts as WISP Client):
STEP1. Use static IP in the PCs that connected with WNAP-6306, in this case configured to “192.168.1.100”.
※ Please be note that the IP address of PC should be configured to the same IP segment as WNAP-6306.

STEP2. Login to the Web page of the WNAP-6306. Then, go to “Internet Setup-> WISP Status” to enable WISP mode.
Before configure the WISP connection, you should check the following settings with your ISP:
1) The SSID of the WISP AP
2) The encryption method and security key of the WISP AP
3) The WAN connection type

STEP3. Click “AP Scan” to find the WISP AP, and then select it to establish the connection.
In this case, the WISP AP has encrypted to WPA2-PSK, so, you have to configure the Security key in next step.

STEP4. In Authentication Type, select “WPA2 PSK”, and then select the Encryption Type and enter the Key.

STEP5. In WAN connection type, select “DHCP user (Cable Modem)”, and then save and apply the setting.
In this case, the WAN type is DHCP.

STEP6. Modify the TCP/IP settings of PC to “Obtain an IP address automatically”.

STEP7. After get the IP assigned by DHCP Server, use command line tool to ping DNS server to ensure the internet connection are established successfully.
Note:
1)The WAN connection type should be configured properly so that the Client can access internet via WNAP-6306 successfully.
2)The encryption method and the security key should be the same as WISP AP.
3)The DHCP server should be enabled in WNAP-6306.

1)Connect WPG-200N to a monitor via VGA (D-sub) or HDMI cable.
2)Power on the WPG-200N, and then you will see the default screen shown as below.
Now, you can get the current IP address, SSID, and login code.

3) Configure the laptop’s IP address of wireless interface to static IP which is in the same subnet but not conflicted with WPG-200.
4) Then, use your laptop or desktop to site survey the wireless signal of WPG-200N. The default SSID is “WPG-200N”.

5) Open the web browser and it will redirect to WPG-200N web page automatically, or you can enter the IP address to access it (the default IP is 192.168.1.1).

6) Select “Admin”, and then enter the password to login the WPG-200N. (The default password is “admin”)

7) Now, you can configure it as your preference.

Yes, the 2.4G and 5GHz of WDRT-730 can be operated as different modes simultaneously.
Yes, it supported IAPP (Inter Access Point Protocol) roaming.
Check if the power plug is loose and the fuse wire of chassis
Check if optical output power is normal and in the range of receiving sensitivity